
The layout created by the tutorial below can now be accomplished using the DiviFilterGrid WooCommerce Extension without any custom code. If time is short and you prefer an easy solution, we would highly recommend the new extension. If time is not an issue and you prefer to DIY, the tutorial below will still work 🙂
The Divi FilterGrid plugin is able to display ANY custom post type in a filterable, searchable grid. The plugin also makes it easy to display custom fields by selecting the fields you want to display within the module’s settings and dragging them in the order you want to display them. You can even add a custom label to be displayed in front of each custom field.
Since the plugin is built on CSS Grid, you can also choose exactly where you want your custom fields displayed: above the title, below the title, on top of the image, etc.
For custom post types that have complex output that cannot be displayed using a custom field, we’ve also added several filters that allow you to display this output anywhere in the item container. You can learn more about these filters in our Custom Elements documentation.
In the following tutorial, I’ll show you how to use Divi FilterGrid to display a grid of WooCommerce products. First I’ll show you a simple solution that displays the product image, price, short description and read more button. I’ll also show you a more advanced solution that displays the product image, variable price, stock status, short description and add to cart button. Let’s get started!
Query Setup
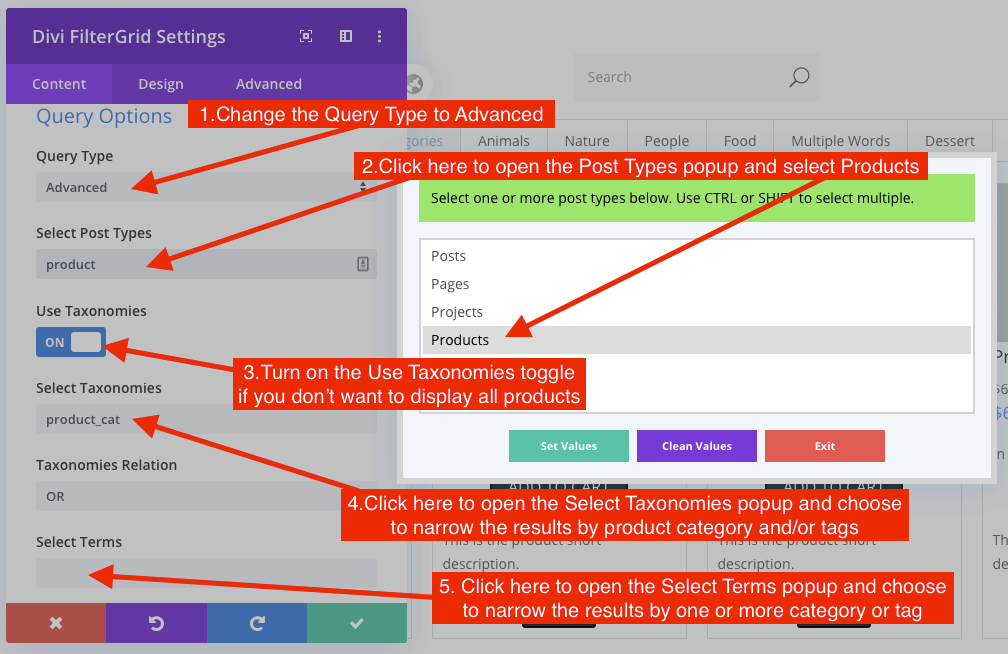
Once you have the plugin installed, add the Divi FilterGrid module to the page you want to display your products. By default the module will display a Basic query of posts and category filters. To display WooCommerce products, go to the Content Tab -> Query Options and change the Query Type from Basic to Advanced.
A new Select Post Types option will appear. Click on the input box and select Products from the popup window and then click Set Values. This will display all WooCommerce products.
If you want to limit the products instead of displaying all products, turn on the Use Taxonomies toggle. A new Select Taxonomies option will appear. Click on the input box and select Product Categories and/or Product Tags in the popup and click Set Values. You can narrow the results by one or both taxonomies.
Next click on the Select Terms option and select the categories and tags that contain the products you want displayed in the grid and again click Set Values.
That’s it for the query setup! There are several advanced options you can use such as including or excluding products with a specific tag, including child terms, etc. For the purpose of this tutorial we’ll move onto adding the filters (optional). Below is a screenshot of how the module settings should look at this point.
Filter Setup
Scroll down to the Filters Options section where you can turn the filters on or off and choose the WooCommerce Categories and Tags you want displayed in the filters. The selection process is very similar to how we set up the query. Choose the taxonomies and terms you want displayed in the filters.
If you want to display the Product Categories in one set of filters and the Product Tags in another set of filters, turn on the Use MultiLevel Filters option.
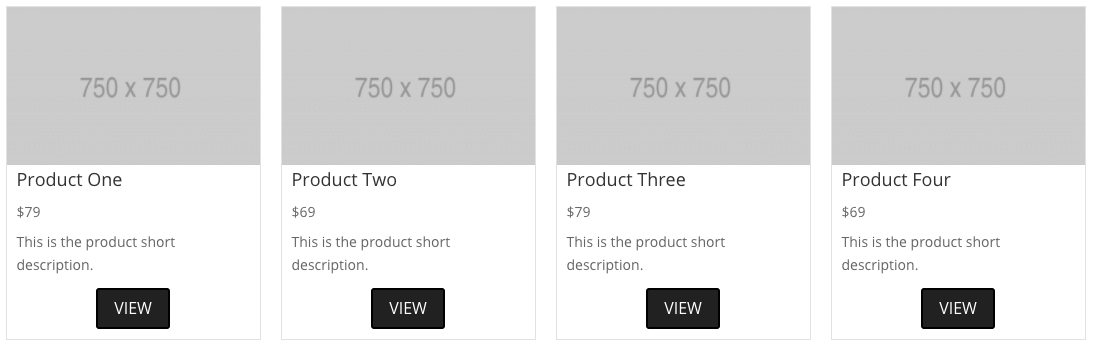
Display Price and Read More Button
If your products are simple and you simply want to display the product price and read more button, you’re almost finished. Scroll back up to the Post Elements section. Here you can choose which elements from the product you want to display: image, title, etc. To display the product short description, turn on the Show Excerpt toggle.
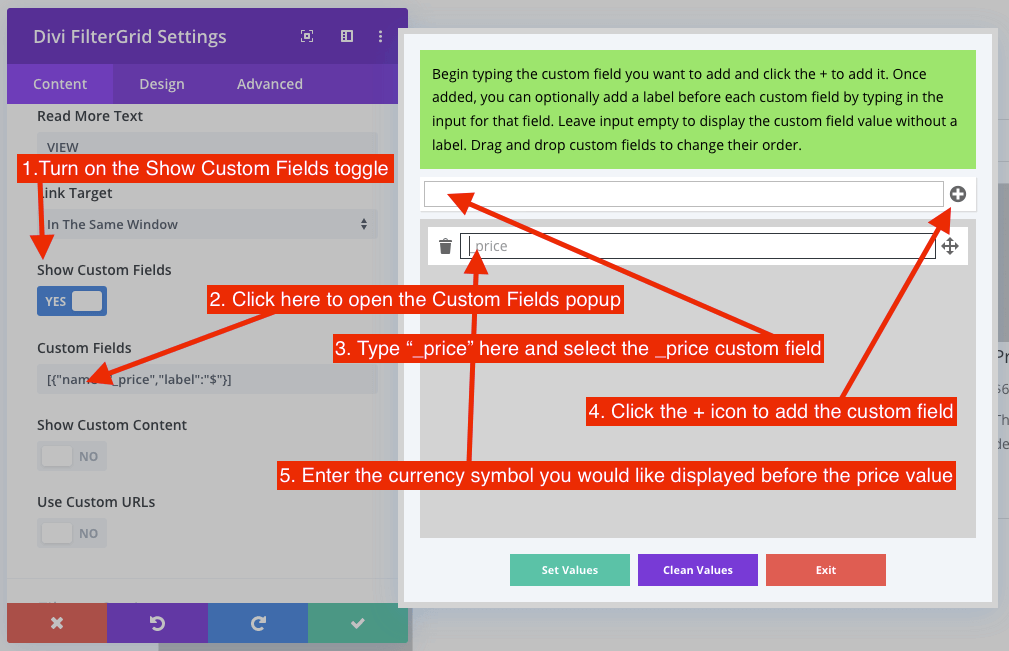
To display the product price, turn on the Show Custom Fields toggle. A new Custom Fields option will appear. Click on the input and a popup window will display. Click on the input in the popup window and type “_price”. Select this and click on the + icon on the right of the popup. This will add the product price to the bottom of each product grid item. You’ll want to enter your currency symbol for the custom field label and then click Set Values.
Below is a screenshot of how the Custom Field popup should appear before you enter your currency symbol.
To move the product price below the title, go to the Advanced tab -> Custom CSS -> Read More Button Container and add the following:
padding-bottom: 1em;
Scroll to the Custom Content Container in the next section and add the following:
grid-row:3;
padding-bottom: 0 !important;
The product image and overlay are placed in the first grid row. The remaining grid item elements are auto placed in new rows below the image and overlay. The CSS above will add the product price below the title, in the third row. You can change the grid-row value to whatever you want depending on where you want it. For example, to place it above the title you would change the grid-row value to 2.
The final result should look similar to the screenshot below.
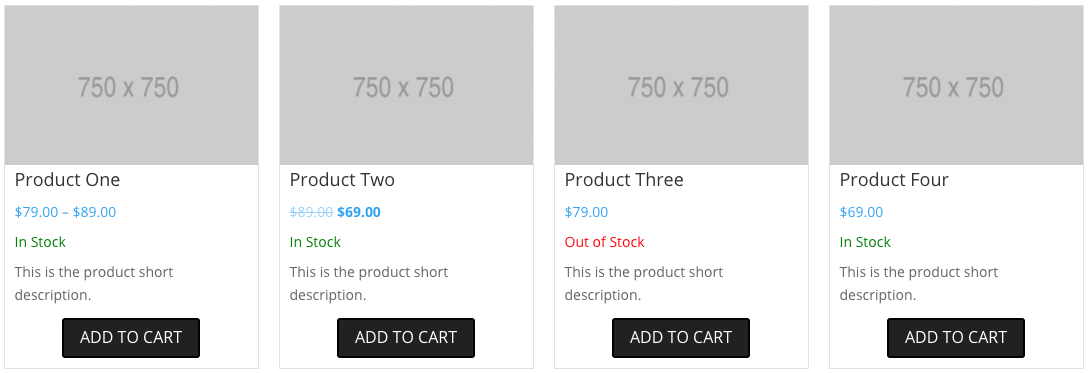
Display Variable Price, Stock Status and Add to Cart Button
If you have sales pricing, variable pricing, or would like to display the stock status or add to cart button instead of the read more button, we’ll have to take a different approach. WooCommerce provides methods for displaying all of these, we just need to use these methods inside Divi FilterGrid’s custom content filter.
First we need to tell the module to load custom content. Scroll down to the bottom of the Post Elements section and turn on the Show Custom Content toggle. Below that turn off the Custom Content Wrapper toggle. This will remove the HTML div that surround the custom content output by default, allowing us to position the price, stock and add to cart button individually.
Now go to your functions.php file within your child theme and add the following:
This filter and function will output the products price, stock status, and add to cart button. Now we just need to reposition them. The following CSS will display the price or price range below the title, the stock status below the price, and the add to cart button below the short description:
.wc-grid .price {
	grid-row: 3;
	font-size: 14px !important;
}

.wc-grid .dfg-wc-stock {
	grid-row: 4;
	font-size: 14px;
	padding-top: 0;
}

.wc-grid .dfg-wc-stock.in {
	color: green;
}

.wc-grid .dfg-wc-stock.out {
	color: red;
}
The final result should look similar to the screenshot below.
Again, you can easily reposition each of these however you like by changing the grid-row value. You can also display any data you want from the global $product object. If you need any help, please create a support ticket and we would be happy to help you customize this tutorial to fit your needs!
* Alternatively, you could use our individual element filters to output the price, stock status and add to cart button exactly where you want. We have filters for each grid item element (thumbnail, overlay, header, meta, and excerpt). This might be a better option if you would like to display data inside the overlay or in a ribbon or banner across the product image.


Hi, this works great with a grid layout. What if I wanted to position these elements in a list layout? The ‘grid-row’ class nor any other CSS doesn’t work here…
How can I achieve that, please?
This should still work if you just add a column declaration like this:
grid-column: 2;
The list layout is based on CSS Grid still but in a two column layout instead of a single column like the grid layout. If that does not work, please create a support ticket and send us the URL of the page you’re working on and we’ll take a look. Thanks!