The Owl Carousel Pro plugin adds two types of carousel modules to the Divi Page Builder. The DP Owl Carousel module loads featured images from posts and other custom post types into a carousel. You can also add the post title, meta, excerpts and custom fields below the image. The DP Owl Image Carousel loads images from your Media Library into a carousel. When creating a logo carousel, you’ll likely want to use the DP Owl Image Carousel module.
This will allow you to select the logos from your Media Library or upload them directly in the module. By default, the module will display five logos at a time. Users can click on the arrows or control dots to rotate through the remaining logos in the carousel assuming you have added more than five images in the carousel.
* You can increase/decrease the amount of logos to display at a time by changing the Thumbnails to Display value in the Design tab of the module.
After uploading your logos to the carousel and viewing the results, you may be left with a less-than-desirable carousel. In this tutorial, we’ll address some common issues you might run into.
Logo carousel images are blurry – the problem
To understand why some images might be blurry, you first need to understand how images are displayed in the carousel. Let’s start by going back to the module’s Design tab. The Thumbnail Size option will attempt to load a thumbnail of the uploaded image in the chosen size. The default size is 400 x 284. The Thumbnails to Display option determines how many images will display in the carousel at one time. Again, the default is five.
If everything goes according to plan, the module will locate the 400 x 284 thumbnails for each image and evenly distribute them in the carousel. Since their are five items displayed at a time and with Divi’s default content width of 1080px, each image will display at roughly 210px wide (1080 divided by 5 minus the 8px margin for each item). The images will look great because they are actually being downsized from 400px to 210px.
The problem is when the module is not able to locate the 400 x 284 thumbnails. WordPress will only create a thumbnail for images that are larger than the thumbnail size. If you upload an image that is 90 x 60 pixels, WordPress will NOT generate a 400 x 284 thumbnail for that image. Even if it did, the image would be blurry because it would need to be upscaled. The module will have no other choice but load the original image. Since the carousel needs to fill a space that is 210px wide, the original image will need to stretch to fill the space. This is why some images may appear blurry in the carousel.
Logo carousel images are blurry – the solution
There are a few possible solutions to this problem. The most obvious is to upload larger logo images. This doesn’t mean to take the original 90 x 60 image and simply resize it so it’s 400 x 284. Now your image will not only be blurry but distorted. If you do not have access to a larger version of the 90 x 60 image that can be cropped or downsized, you have four options.
1. Turn on the Auto Width Images option in the Content tab. As we described earlier, the carousel will fill each carousel item with the image for that item. It’s the CSS equivalent of width: 100%. This is how the carousel creates a nice, even grid of five items across.Turning on the Auto Width Images option will disable this grid. Each carousel item will be exactly the size of the image it loads. If the image is 90 x 60, the image will display at 90 x 60. If the next image has a 400 x 284 thumbnail, the next image will display at 400 x 284. It’s the CSS equivalent of width: auto.
Keep in mind this option will ignore the Thumbnails to Display value in the Design tab. Instead of displaying five images at a time, the carousel will show as many images as it can fit in the 1080px container. Users can still use the arrows and control dots to scroll through the carousel.
2. Increase the Thumbnails to Display value in the Design tab. If all of your images are 90px wide, increase the value to 11 (11 multiplied by 98px equals 1078px). 11 items is a little extreme. But if your images are 150px wide, you would only need to increase the value to 7 which is an acceptable number.
3. Increase the Item Margin value in the Design tab. This increases the space between each item, therefore decreasing the space each image needs to fill. This could be combined with the first option above.
4. Normalize your images. We’ll show you how to do this below. But the idea is to embed the original images into larger images using Photoshop or similar software. This solution also fixes the next problem.
Logo carousel images are not vertically aligned – the problem
If your images vary in size and aspect ratio AND are too small to generate a thumbnail, the images will appear to be staggered. They will all be the same width but will vary in height. Each carousel item is the same width (unless you’ve turned on the Auto Width Images option), but the height will depend on the aspect ratio of the image. If you have a 90 x 60 image and a 90 x 180 image, the smaller image will be 1/3 the height of the taller image.
Logo carousel images are not vertically aligned – the solution
The solution to this problem is also the best solution for blurry images – normalize your images.
Normalizing logo carousel images
Normalizing your images is the best way to prevent blurry and staggered images. So how do you normalize your images?
The best way to do this is determine the largest image you have from a group of images. Let’s say the image is 200 x 75. The rest of the images you want to place in the carousel could be smaller and might vary in aspect ratio. We want to normalize our images so they are all 200 x 75. But we can’t simply resize all images to 200 x 75. This will make them blurry and distorted.
We need to place the smaller images into a larger image. We do this by creating a new image in Photoshop (or other image editing software). The image size should be 200 x 75 (or the size of your largest image). You can make the image transparent or give it a background color, depending on how you want the final image to appear. In Photoshop, you’ll embed the original image into the new image by clicking on File -> Place Embedded. Select the image from the correct folder on your computer. Photoshop will automatically place the image in the horizontal and vertical center of the new image. Save the image, click on Edit -> Step Backward to remove the embedded image, and repeat the process for the remaining images.
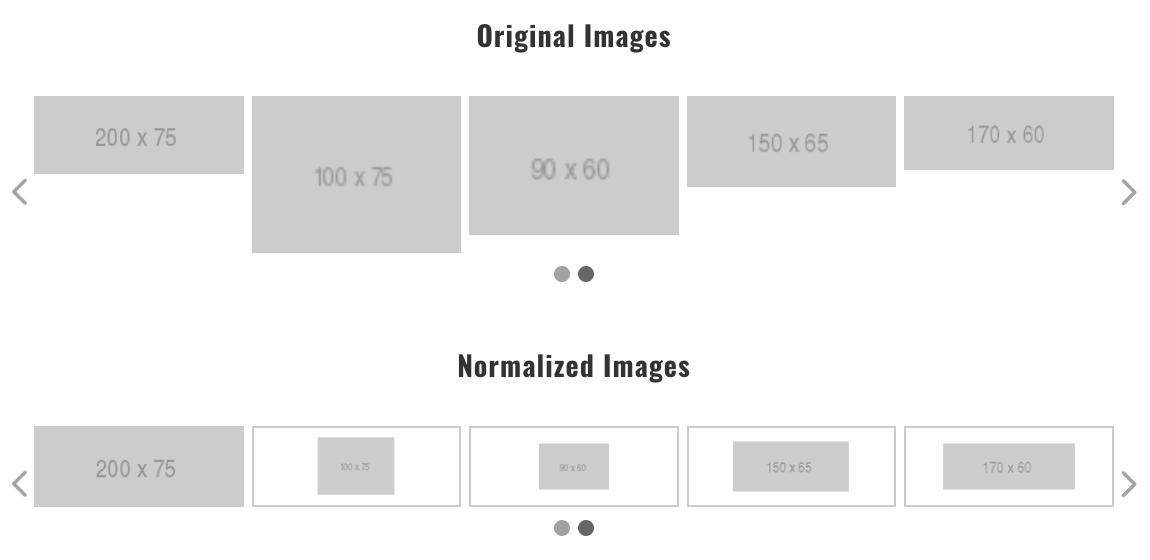
Now all of our images in the logo carousel are the same size and are all vertically and horizontally centered. The image below shows the before and after:

In the Original Images example above, the logo carousel contains several images of varying sizes and aspect ratios. The result is a staggered grid of images. Every image is 210px wide so it fills the one-fifth slot it’s contained in. But some images are shorter than others. And the smaller images are very blurry.
In the Normalized Images logo carousel, all of the images are 200 x 75 since that was my largest image. I embedded the smaller images in a transparent image that is also 200 x 75. Now all of my images are centered and the smaller images are not blurry. I also added a border around each carousel item to help distinguish each image from the next. You can do this by adding a border to the Carousel Items Container CSS box in the Advanced tab like this – border: 2px solid #ccc;
Another option would have been to add a background color to the new images in Photoshop. Without the border or a background color, the images would appear to be unequally spaced horizontally.


