Are you having a hard time understanding why some of the images you upload to your website work and display correctly in Divi and WordPress but others do not? Are you confused about how WordPress and Divi thumbnail images are created? Maybe you’re here because we sent you a link to this article from our support system 😉
Getting images to display correctly on our websites can sometimes be more complicated than we would like. The goal of this article is to explain how WordPress and Divi display and alter your original images and how that can sometimes lead to unexpected results. Let’s start with a general overview of what happens to an image when you upload it to the WordPress media library.
WordPress Image Upload
Let’s say you have an image on your computer – alien-spaceship.jpg. You upload the image to your website within WordPress to use as a featured image in your blog post. You now have an exact copy of the image saved to your webserver’s file system. However, it doesn’t end there.
WordPress doesn’t simply copy the image from your computer to your web server. It makes several “thumbnails” of your image and saves those to your webserver in the same subfolder as the original image. Thumbnails are simply different versions of your original image in various sizes and aspect ratios. The filename for these thumbnail images is the [original-filename]-[width]x[height].[extension]. For example, a 300 x 300 pixel thumbnail image of our original alien image would become alien-spaceship-300×300.jpg.
WordPress creates LOTS of thumbnails for every image. How many exactly depends on the theme and plugins you have installed as each of these can add custom thumbnail sizes for WordPress to generate. Let’s start with the thumbnail sizes included in WordPress core.
WordPress Thumbnail Image Sizes
WordPress generates the following thumbnail sizes every time you upload an image in the format of name – size:
- thumbnail – 150×150 (cropped)
- medium – 300×300 (scaled)
- large – 1024×1024 (scaled)
- 1536×1536 – 1536×1536 (scaled)
- 2048×2048 – 2048×2048 (scaled)
Divi Thumbnail Image Sizes
The Divi theme generates the following thumbnail sizes:
- et-pb-post-main-image – 400×250 (cropped)
- et-pb-post-main-image-fullwidth – 1080×675 (cropped)
- et-pb-portfolio-image – 400×284 (cropped)
- et-pb-portfolio-module-image – 510×382 (cropped)
- et-pb-portfolio-image-single – 1080×9999 (scaled)
- et-pb-gallery-module-image-portrait – 400×516 (cropped)
- et-pb-post-main-image-fullwidth-large – 2880×1800 (cropped)
- et-pb-image–responsive–desktop – 1280×720 (cropped)
- et-pb-image–responsive–tablet – 980×551 (cropped)
- et-pb-image–responsive–phone – 480×270 (cropped)
What is the Purpose of Thumbnail Images?
That’s a lot of thumbnails! WordPress and the Divi theme alone generate 15 thumbnail sizes for every image you upload to your site. Why do we need so many different thumbnail sizes?
Let’s use our Divi FilterGrid plugin for example. By default, this plugin displays a filterable grid of posts and includes the featured image, title and author. But it doesn’t display the featured image in it’s full, original size as it was uploaded to WordPress from your computer. In many cases, this image would be too big and would cause the page to load too slow. Also, since Divi FilterGrid displays four posts horizontally in each row by default, the featured image does not need to be very big. Each image only needs to be 255 pixels wide.
For these reasons the plugin instead displays the 400×284 thumbnail of the featured images generated by the Divi theme. This is usually much smaller than the original image. Some of the default Divi modules also use the 400 x 284 thumbnail along with the remaining thumbnail sizes. For example the portfolio module when changed to carousel layout displays the 510 x 382 thumbnail.
Missing & Inconsistent Thumbnail Image Sizes
Now that we know the purpose of thumbnails, let’s look at some possible thumbnail issues. In most scenarios the issue is very simple – the thumbnail does not get generated.
WordPress will not generate thumbnails for an image when the original image size is smaller than or equal to the thumbnail size. This can cause inconsistent layouts. Let’s dive into this.
Let’s go back to our Divi FilterGrid plugin. Again, this plugin displays the 400 x 284 thumbnail by default. As long as this thumbnail exists for all posts, the grid will look very consistent and uniform. If a thumbnail does not exist, the plugin will instead revert to displaying the original image in its original size. This can lead to an inconsistent look.
* To check if the thumbnail exists, right click on the image and inspect element to view the image URL. Let’s use the following as an example: https://example.com/wp-content/uploads/2050/12/alien-spaceship.jpg. The 400 x 284 thumbnail URL would just get the size inserted between the file name and the extension and would become https://example.com/wp-content/uploads/2050/12/alien-spaceship-400×284.jpg. If you go to this URL and get a 404 error, the thumbnail does not exist.
Back to the inconsistent grid layout. Imagine the original image uploaded to WordPress and used as the featured image of a post is only 200 x 300 pixels. This is a very common issue when displaying portrait pics of people which are often pulled from social media.
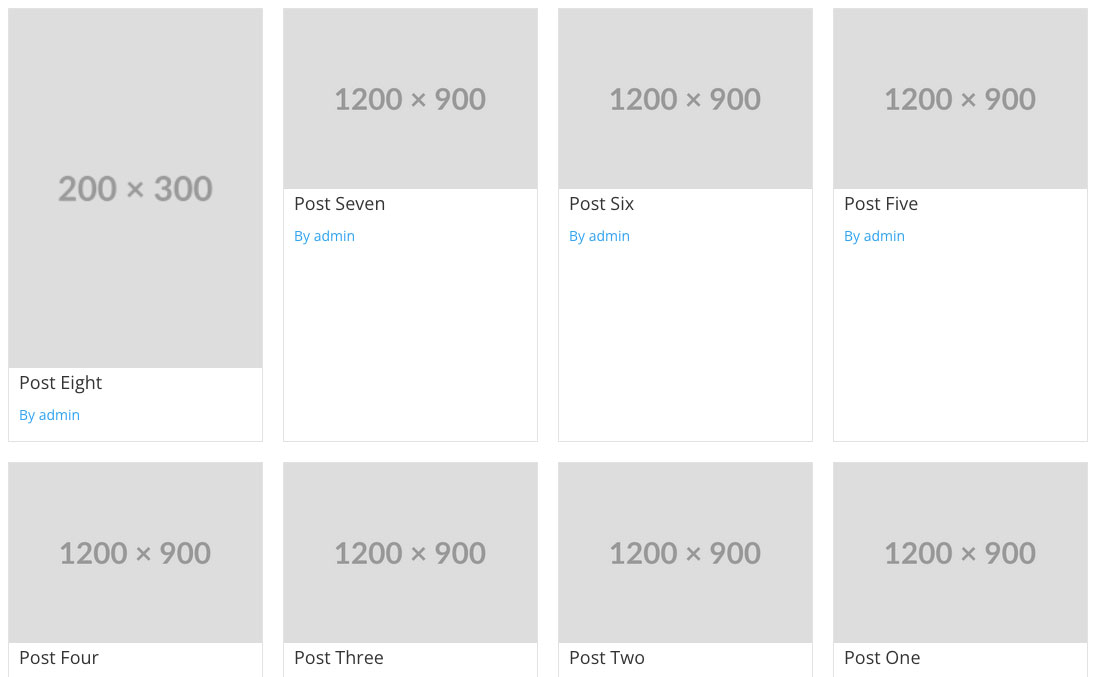
WordPress will NOT generate a 400 x 284 thumbnail of this image because it’s too small. It would have to “upscale” the image (which would make it look pixelated) to generate this thumbnail size so instead it skips it. If the Divi FilterGrid plugin cannot find the 400 x 284 thumbnail image, it will revert to showing the original full size image. For this reason, the featured image for this post will not look the same as the other images in the grid (assuming the 400 x 284 thumbnail does exist for the other featured images). The screenshot below shows what this looks like.
All of the posts in the grid above have the same 1200 x 900 pixel featured image except “Post Eight”. The original image size for that featured image is only 200 x 300. The Divi FilterGrid plugin is set to display the 400 x 284 thumbnail by default. That thumbnail exists for all of the images except the 200 x 300 image since it is too small. For this reason, the original 200 x 300 image is displayed instead. This throws off the entire grid layout and creates white space below the other three post authors in the first row.
Solution
The moment we’ve all been waiting for. What’s the solution?
The solution is simple. Upload larger images 🙂 The larger your image, the more thumbnails will get generated in all of the different thumbnail sizes and the less likely you are to run into missing thumbnails.
Obviously this is not always possible. Let’s imagine you’re building a web page to display pictures of you and your coworkers for your website. Everyone emails you a profile pic of themselves and half of them are download from social media and are ironically thumbnails themselves of the original image. But they don’t have the original image and don’t have an alternative. If uploading a larger image is not possible you do have some alternative options:
1. Upload larger images. I know. I know. I’m supposed to provide alternatives to this solution. Once you read the alternatives, I think you’ll agree the best solution hands down is to simply upload a larger image. Even if that means finding a replacement image that is larger or retaking the photo, this is still the best option.
2. Upscale the Image. This could be a “1a” solution because again, the easiest solution is to upload a larger image. Even if that’s not possible, technically it is. Let’s take our 200 x 300 image example. We could resize it on our computer to 400 x 600 and re upload it. This would make it large enough that the 400 x 284 thumbnail would get generated and the layout would work. The downside is that up scaling an image always results in loss of quality so this is not a great option.
3. Display a smaller thumbnail size. In Divi FilterGrid, you can change the default 400 x 284 thumbnail size to any other thumbnail size registered on your site like the ones listed at the top of this article. But 400 x 284 is already pretty small. The next smallest size is 300 x 300. But this won’t work in our example above because our original 200 x 300 image is too small for this thumbnail size too. We would have to pick the tiny 150 x 150 thumbnail size which would not look great. In Divi FilterGrid, you would likely want to display more posts per row so the images were not pixelated. You can do this by decreasing the Items Width in the Design tab which will create more columns.
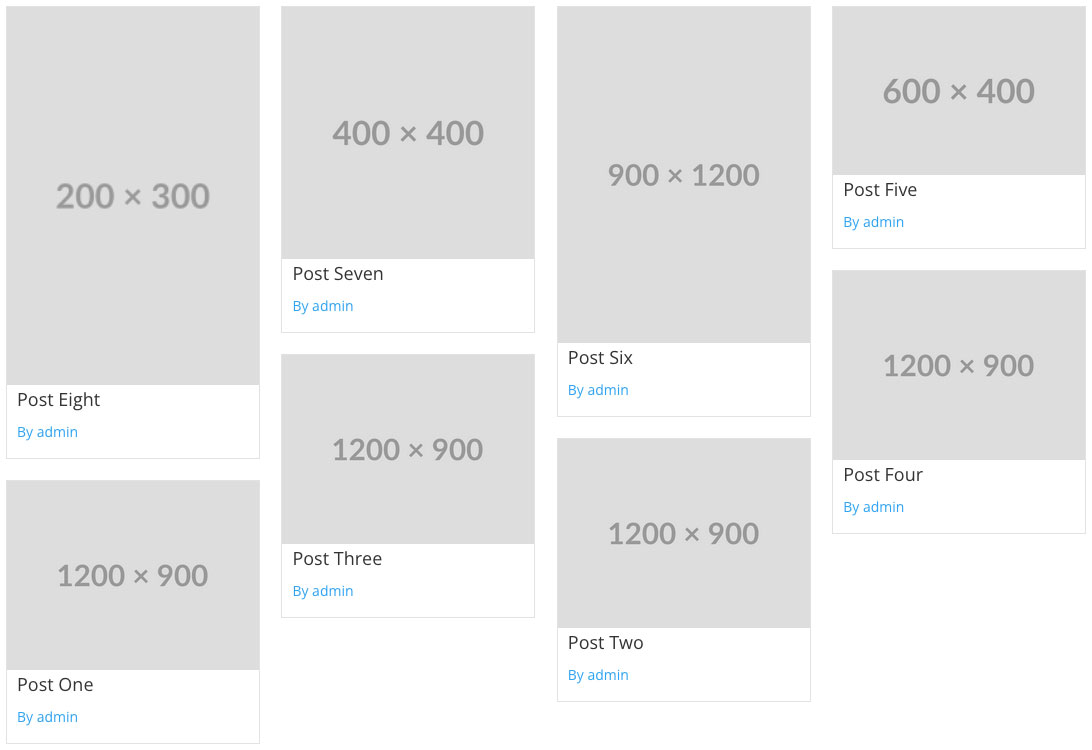
4. Adjust your layout. Again this applies directly to Divi FilterGrid but you may be able to adjust your layout to make a smaller image or thumbnail work. In Divi FilterGrid, you can switch from a Grid layout to a Masonry layout from within the Design tab of the module’s settings. This type of layout creates a staggered display of images. It is actually preferred that the images be different sizes and have different aspect ratios to create the staggered look. You may need to switch the thumbnail size from 400 x 284 to “Original Image Uploaded” for the staggered layout to look best. This is exactly how we created the masonry layout in the screenshot below.


