Divi Module Builder
This page should help answer any questions you might have if you run into issues while creating new modules with the Divi Module Builder. Please read over the sections below carefully if you are having issues. More detailed instructions for each field type can be found in the left navigation menu. If you still need help, please create a support ticket and we’ll be happy to help you get started or answer any questions!
Getting Started
Using the Divi Module Builder is very easy. After activating the plugin on your site, you’ll have a new menu item within your WordPress dashboard called Custom Modules along with sub-menu items to view, add, and edit modules and activate your plugin license for automatic updates. Clicking on the Add Module sub-menu item will take you to the module editor where you can create your first module. You can also follow along our Getting Started video to see how to create your first custom module and add a text field.
Creating Your First Module
Inside the module editor, you’ll see two panels. The left panel is for adding new fields that will be displayed as options within your module in the Divi Builder. The right panel is for adding the HTML Output that will control what the module displays on the front-end. The right panel is also for adding custom CSS and Javascript.
Module Options
There are currently two options available for each module that you can select before you begin adding fields:
- Make module fullwidth – checking this option will limit the module to fullwidth sections and give you the ability to stretch the output the full width of the browser.
Module Fields
When adding a new field, you have between four and six options to set depending on the field type.

- Field Label (required) – the Field Label is the label that the end user will see to the left of the input in the module.
- Field Description (optional) – a Field Description can be added to help explain the purpose of the field and will display below the input in the module.
- Repeat Field – this option will make the field available within a
- Field Type (required) – the Field Type will determine what type of input the user sees. Current field types available are text box, text area, color picker, image selector, icon selector, Yes/No toggle, and select.
* The select field option will let you add select options in a comma-separated list. The value of the first field option will be 1, and the values for all other options will increase by 1 in the order you list them. For example, if you list “red, blue, green” as your select options – red will have a value of 1. Blue will have a value of 2. Green will have a value of 3. - Design Tab – this option will only become available if a text or text area Field Type is selected. Checking this box will add font controls for this field within the Design tab of the module. You still need to tell Divi which element to apply the font controls to by adding a special class in the HTML Output. The class name is dp_field_ + the field identifier. For example, if your field identifier is title, the class you would add to your HTML output would be dp_field_title and would get added like this:
<div class="custom-container"> <h2 class="dp_field_title"> <?php the_title(); ?> /* Older versions of the Divi Module Builder before version 2.1 cannot use native PHP tags. Use the shortcodes instead: [divi_php] the_title(); [/divi_php] */ </h2> </div> - Hide Field – this option will only become available if a text or text area Field Type is selected. This is useful if you want to give users font control over an element in your HTML Output but don’t want the user to control the content of this element. An example would be if you were looping through posts and creating an output with the post title, content, categories, etc. You could add font control to all of these elements by adding a new field for each in the left panel, checking the Design Tab for each field, and adding the proper class for each field in your output. You could then hide each field from the Content tab in the module by checking the Hide Field option. You will still have font control for each field in the Design tab, but the user will no longer see an input in the first tab of the module.
- Field Identifier (required) – this value must be unique. It will not be visible anywhere in the module. This is how you will reference the field in the HTML output. You should only use lowercase letters, numbers, and underscores for field identifiers. No spaces. No dashes. In the Design Tab example above, we used PHP to echo the post title. If we wanted to add the post title as an input within the module that the user could change, we would need to tell the HTML Output where the user’s value needs to be displayed. If you are displaying a field inside of HTML tags, you need to wrap the field identifier inside %% before and after. So a field with identifier title would get outputted by adding this: %%title%%. If you are displaying a field within the PHP tags, you can simply add a $ in front of the field identifier. The field with identifier title would be outputted inside PHP by adding this: $title. The following illustrates how you would add the same field to HTML or PHP:
<div class="custom-container">

    <h2 class="dp_field_title">%%title%%</h2>

    <h2 class="dp_field_title">
        <?php echo $title; ?>
    </h2>
</div>
HTML Output
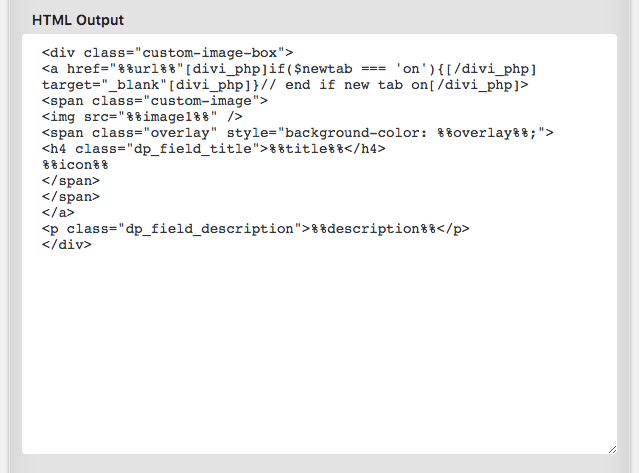
The HTML Output is where you will control the HTML that your module creates. You can combine HTML and PHP in this box, along with adding fields created in the left panel using the method explained above.
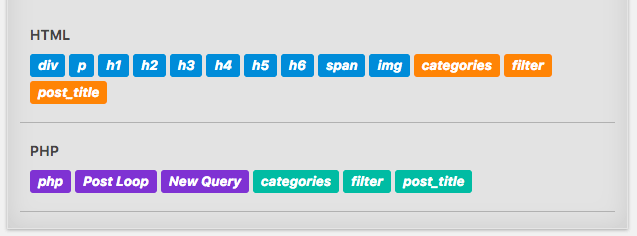
A nice feature we’ve added below the HTML Output box are quick buttons. Clicking on these buttons will insert code into the output box above. You can also use these buttons to insert any fields you’ve created from the left panel (new fields will only display once the module has been saved). Orange field identifier buttons are used to insert fields into HTML. The green field identifier buttons are used to insert fields into PHP.
Keep in mind you are not limited to using these buttons. They are there to help, but you can add any HTML or PHP code that you want to create your module output. If you’re not sure how to add a field from the left panel, the buttons can be useful for showing you exactly how the field needs to be formatted.
Adding PHP to the HTML Output
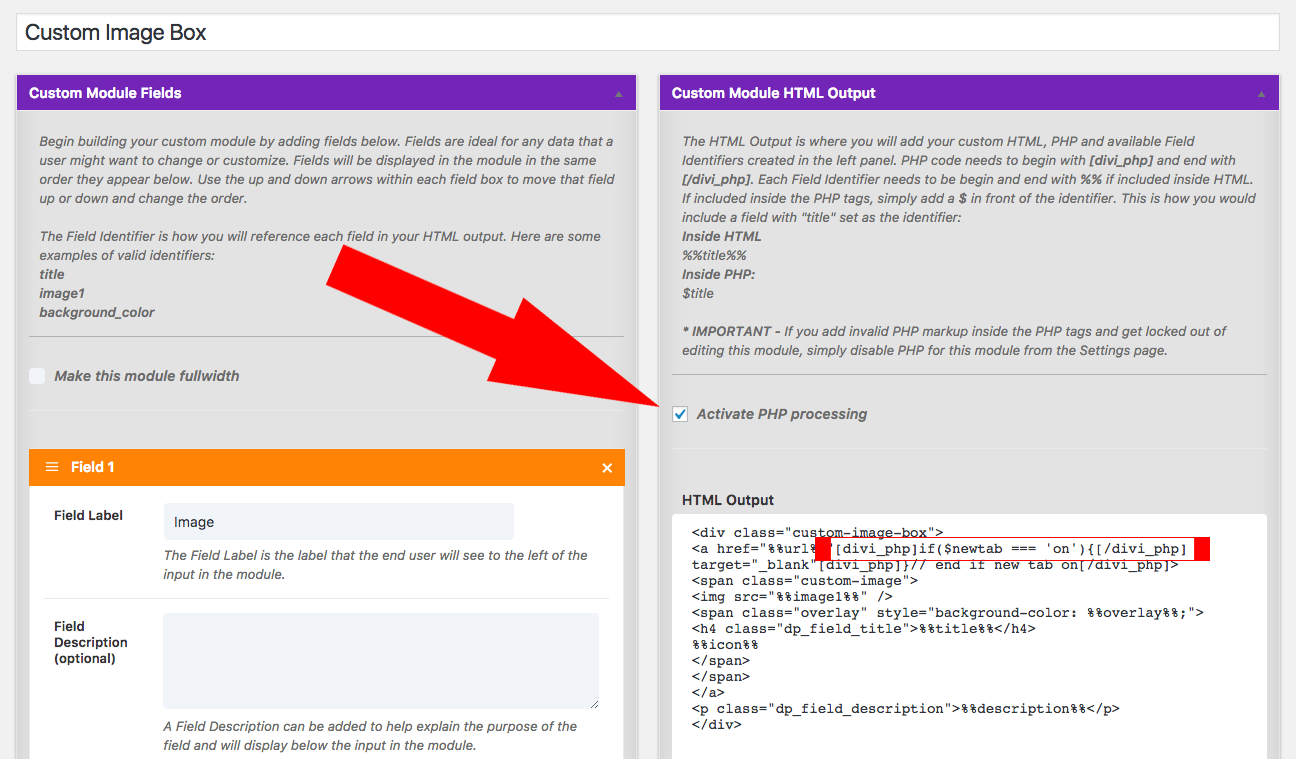
Each module has the ability to process PHP as long as you activate PHP processing for that module AND wrap the PHP inside of the tags show below in the HTML Output section. By default, PHP processing is turned off. You can activate it by clicking on the Activate PHP processing checkbox in the HTML Output panel as shown below:
Older versions of the Divi Module Builder required that all PHP tags be replaced with the shortcodes below. Since version 2.1, this is no longer the case. Either of the examples below will work.
<?php PHP CODE GOES HERE ?>
[divi_php] PHP CODE GOES HERE [/divi_php]
Disable PHP
In the event you write improper PHP code in the HTML Output editor, you will likely see an error or blank white page after you click the update or publish button within the module. This will essentially lock you out from editing the module. In this case, you will need to deactivate the PHP processing for that module, edit the module and fix your mistake, and turn PHP processing back on. Since you’ll be locked out from editing the module, you can turn off the PHP processing for each module in the Settings page:

CSS Output
The CSS Output box below the HTML Output in the right panel is used for adding custom CSS for the module you are currently building. This provides a quick and easy way to apply styling to the HTML elements you created in the HTML Output. Keep in mind this CSS gets added to the header and therefore will apply to any element with the same ID and Class names.
Javascript Output
The Javascript Output box below the CSS Output in the right panel is used for adding custom Javascript/jQuery to the module you are currently building. Do NOT include the <script> </script> tags when adding your Javascript. Your code will automatically get wrapped in these tags. Again, this code will get added to the footer and become available to any matching elements in the page or post.
Repeat Fields HTML Output
The Output box below the Javascript Output in the right panel is used for adding HTML for repeat fields. This section is similar to the HTML Output section but works much like a foreach loop. To echo the results of this loop, you then need to add %%repeat_fields%% inside HTML or $repeat_fields inside PHP in the HTML Output section at the top of the right panel.
The code entered in this section will get wrapped in a div container with class dp_dmb_repeat_item. You could then target each “child” by adding a custom class in the HTML Output and then targeting the children like so:
.my_custom_class .dp_dmb_repeat_item { display: block; }
Cloning Modules
You can clone published modules from the Divi Module Builder’s Settings page. Cloning a module will make an exact copy of the module and add it to the Draft Modules section below the Published Modules on the Settings page.
Exporting/Importing Modules
You can export modules from one site to another by clicking on the Export button for an individual module on the plugin’s Settings page. This will download a json file of your module which can then be imported into another site from the plugin’s Custom Modules -> Import page. When a module is exported and imported into another site, it will contain everything from the original module including all fields, checkboxes, and HTML, CSS and Javascript Output boxes.
* Keep in mind that if you plan to use the module builder on multiple sites, you should purchase the unlimited license.
Modules available on Diviplugins.com can be imported directly from the plugin’s Custom Modules -> Import page. They can also be imported manually by downloading the modules from the website and importing the json file using the import button at the bottom of the import page.